Under the current circumstances, the traditional bluebook is not viable. However, you can use a Moodle quiz or the Moodle assignment to distribute and grade the type of exam that works for your course.
A Moodle assignment works well for collecting final papers or untimed essay questions.
For timed exams, or exams with multiple choice or other standard answers, the Moodle quiz may be a great option. One professor, who started using the Moodle quiz instead of the bluebook last fall, wrote IITS while grading the exams. “I am grading this and it is working great. For the first time in my career I am not struggling to read the student’s writing!”
This blog posts explains how to set up a Moodle quiz for your final exam and how to grade student submissions.
Overview of the quiz activity
A first step in successfully creating Moodle quizzes, is to understand a few basics. The quiz has a couple of related, but distinct, parts. Quiz settings control when the quiz is open, how questions and answered are displayed to students. Questions are stored in a separate Question bank and then added to one or more quizzes. After students submit their responses, answers are graded automatically, if possible. Once answers are graded, either manually or automatically, you can easily see how the class as a whole.
Step 1: Add the quiz activity
- Turn Editing on from the course settings on the upper right corner of your course window.

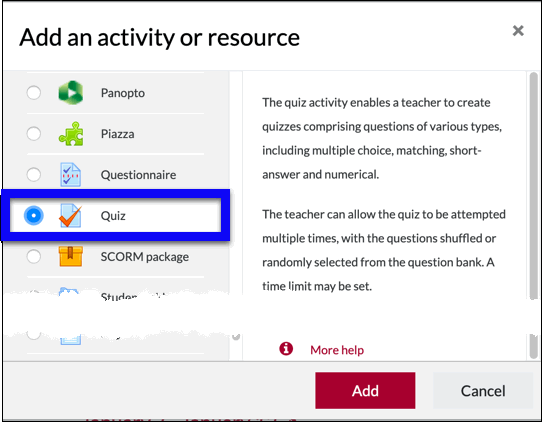
- In the appropriate week/topic, click on the “+ Add an activity or resource” link.

- Select the Quiz activity and click the add button.
 .
.
Configure the quiz settings
Now you need to configure quiz settings to set up the time and length of the exam. This is also where you set up the general layout and other details about how the quiz will display to students. Below are the settings most important to make sure the exam functions the way you want.
General settings
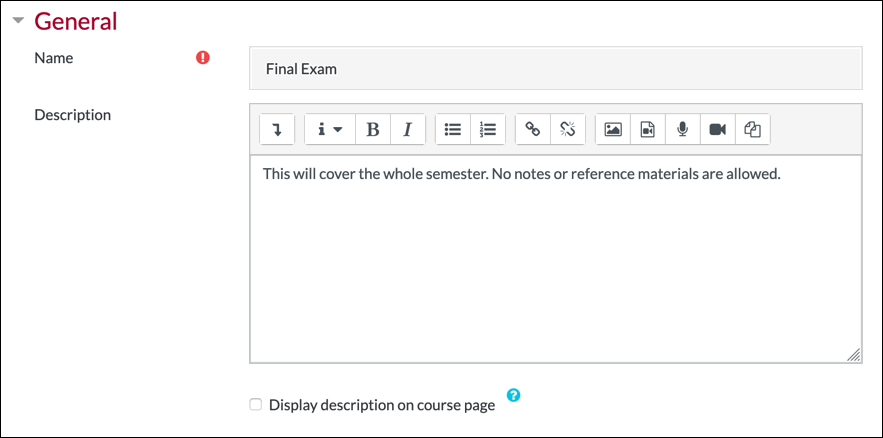
You must fill in the general setting to give your quiz a name. This is name that students see on the main course page.
You also an assignment Description. Use the description field to give a summary of what is on the test, rules for test takers, or other overview information about the exam.
Timing
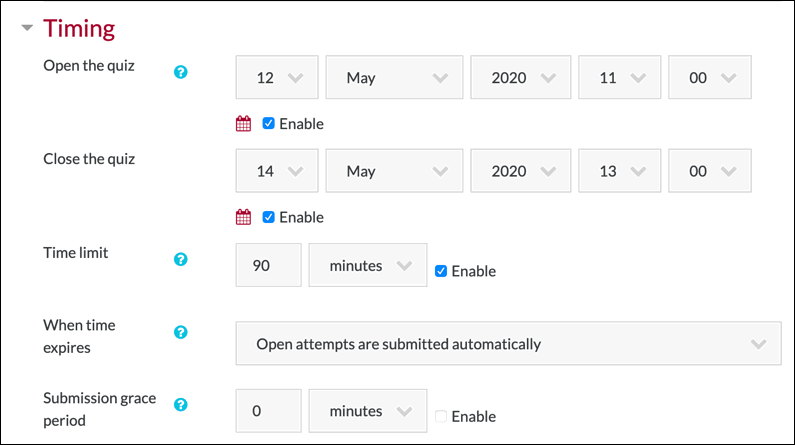
Make sure your Moodle settings accurately reflect when are administering the exam using the timing options. Most of the time settings are straightforward. The settings apply to any students in your class, but you can override these time settings for individuals or groups.
Open the quiz: This is the earliest date students can see the exam.
Close the quiz: After this date, students cannot work on the exam.
Time limit: Length of time to work on the exam.
When time expires: This setting determines what happens when a student has not submitted the test, but the time allotted expires. In almost all cases, we suggest using the setting, “Open attempts are submitted automatically.“ Often, students merely neglect to hit the submit button, even when they know they are finished.
Submission grace period: This setting is only useful if you set a grace period in the time expired setting.
Grade
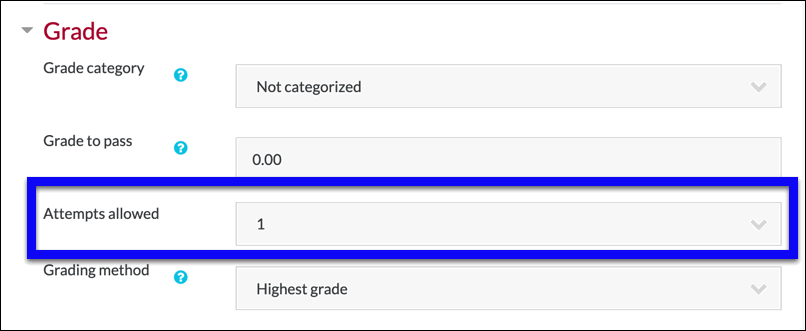
For an exam, you typically want just one attempt. You can set that in the grade section. Set Attempts allowed to 1. Should a student have a power outage or other problem during the exam, you can clear the bad attempt and let them take the exam again.
Review Options
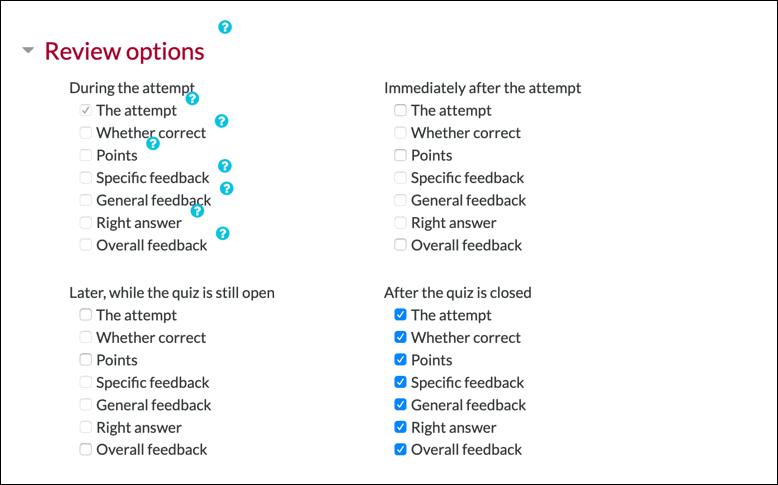
There are a number of options around exactly what feedback to give students and when to give it. In an exam, you likely want to wait until the exam period closes, and to show all available feedback to the student ONLY after the quiz attempt is closed.
Other settings
The quiz activity has additional settings for things like layout appearance that are not covered in this post. Set those as desired. Defaults should be fine.
Save and Display to continue building exam
Once you have all the settings the way you want, click the Save and Display button.
![]()
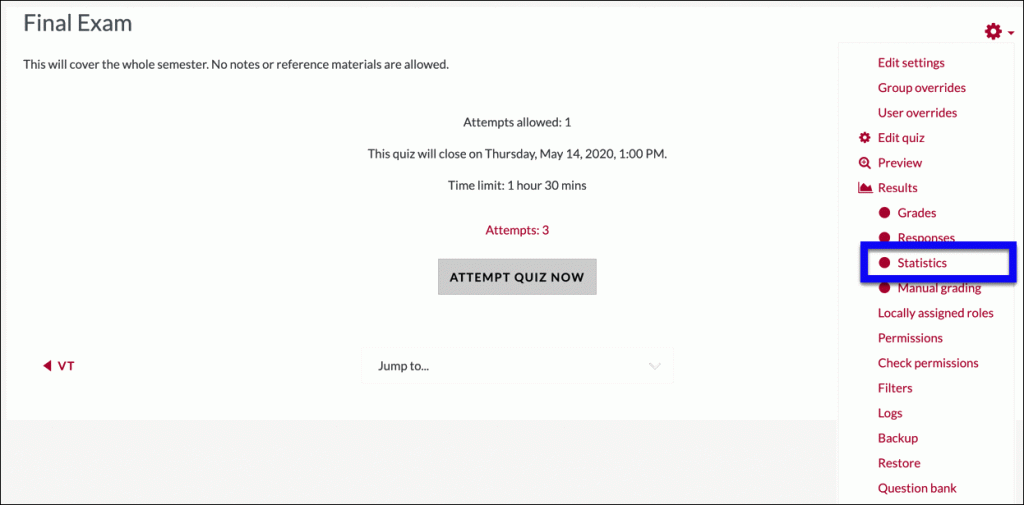
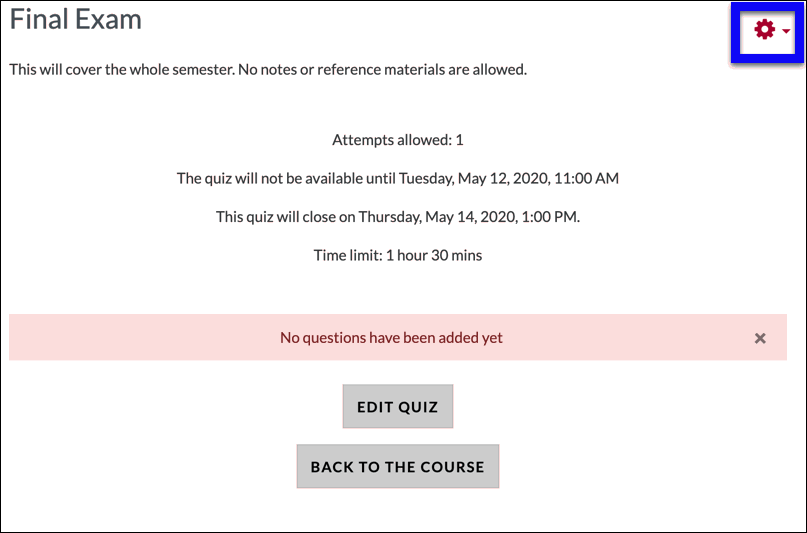
You will then get a screen confirming the settings you just selected. Look the settings summary details make sure they are correct. If needed, click on the gear action menu in the upper right corner, select edit settings, and adjust any details in your quiz settings. In addition to adjusting settings, this gear gives access to a variety of key quiz components.
Step 2: Add questions to your quiz
All questions for your class are stored in a Question Bank. If you have a lot of questions or have multiple quiz activities in your course, you’ll want to take some time to learn best practices for using the question bank and question categories. If you just have a lot of questions in one exam–especially if you are asking questions in several different sections or over several different units–take a few minutes to create your question categories BEFORE adding questions to your exam.
Once you have the quiz set up, and you created your (optional) question bank categories, you are ready to add your exam questions. There are many types of questions. We’ll just look at a few.
Edit quiz
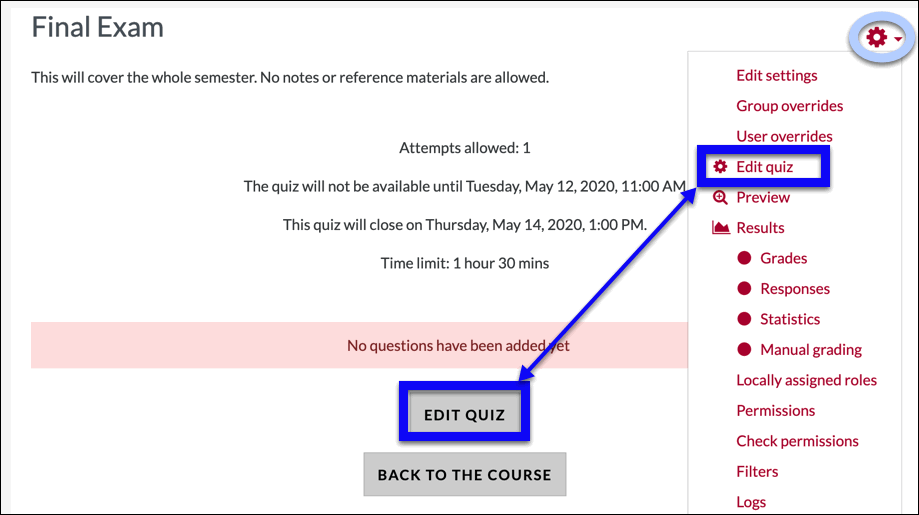
Start by clicking on the quiz activity and selecting Edit quiz from the gear action menu or from the Edit Quiz button.
Adjust overall point value for exam
The edit quiz menu lets you add and adjust your quiz content, including the total point score and point score for individual questions.
The total point score for your assessment set by the maximum grade. The default score is 10. If you want a different total score, enter it in the Maximum grade box and click save. Although each question you add also has a score, those are weighted to add up to the maximum grade.

Add questions
Now you are ready to add questions. If you have questions already in your question bank, you can add those right now. Otherwise, you can create questions for this quiz activity. Either way, select the add questions option. For this post, we will create an essay question and a multiple choice question.
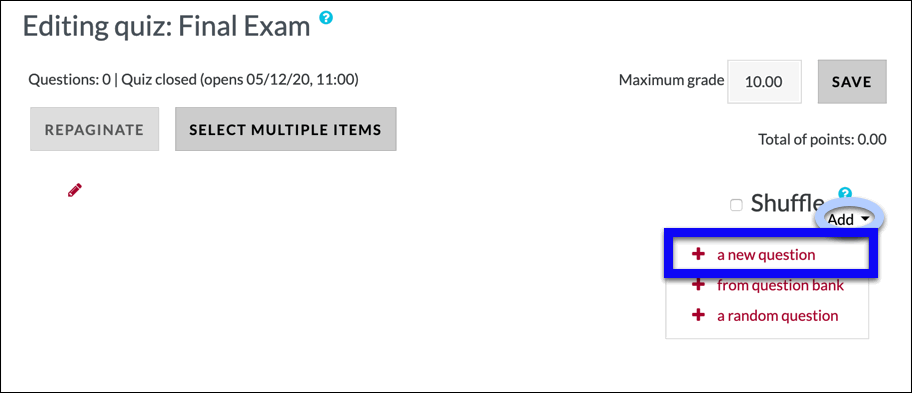
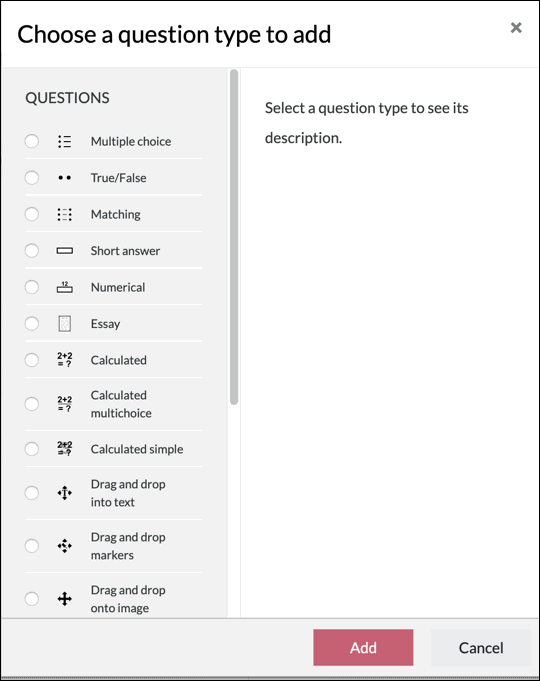
Next select your desired question type from the available options.
Standard setting in all question types
There are many question types, including the essay and multiple choice types described below. After you select the quiz type you want, you will have a number of options for that particular question type.
All question types (except the “description” type, which is just informational) ask the following required or optional questions:
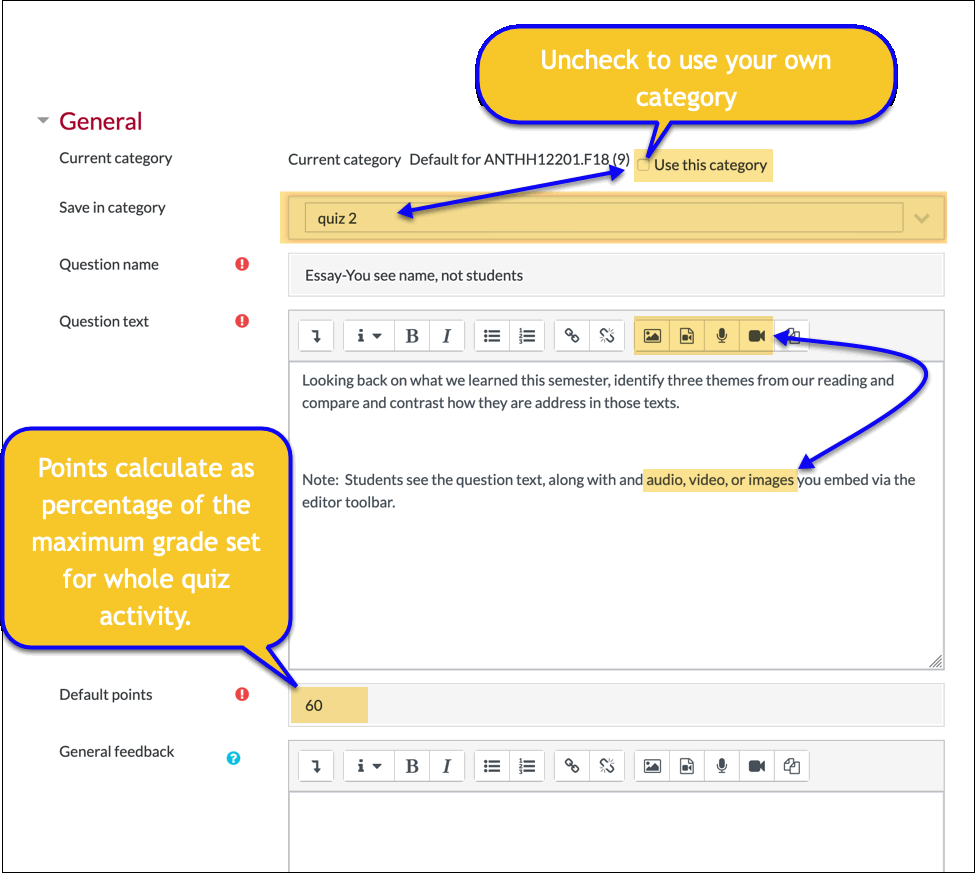
- Category (required, but defaults to category for class): Uncheck “use this category” box if you set up other question bank categories that you wish to use for this question.
- Question name: This field is for your benefit only. Students do not see it. Give the question a short name that will help you identify the question content.
- Question text: This is the text students see. You can add audio, video, or images using the editor toolbar
- Default points: Points calculate as percentage of maximum grade set for whole quiz activity.
- General Feedback: Students see text in the general feedback form after they submit their response, according the review options you set when you configured the quiz activity.
Add essay questions
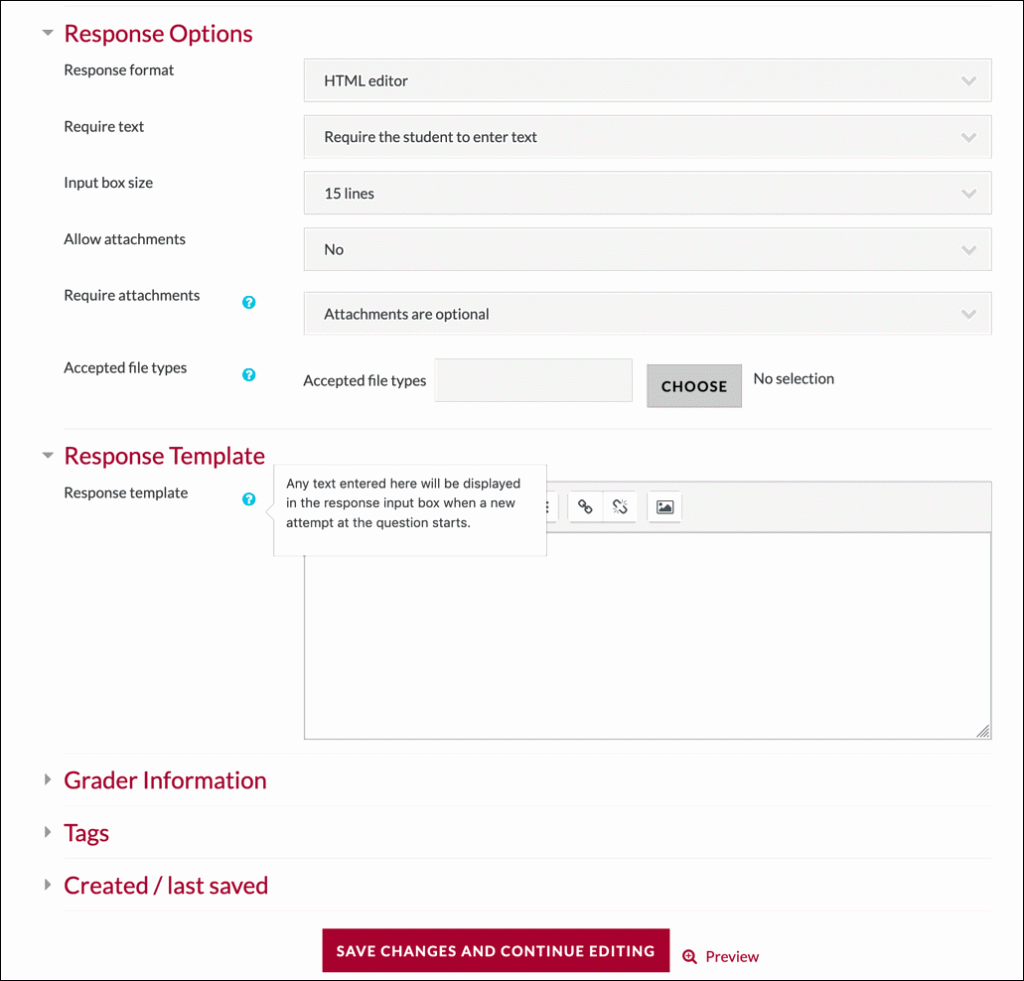
You can ask students essay questions and ask them to respond using the Moodle editor or via an uploaded file. Use the settings to get responses in your desired format.
If you want students to upload a file, you can specify the file format.
The response template is an interesting option, because it lets your give a structure for students to use when answering the question.
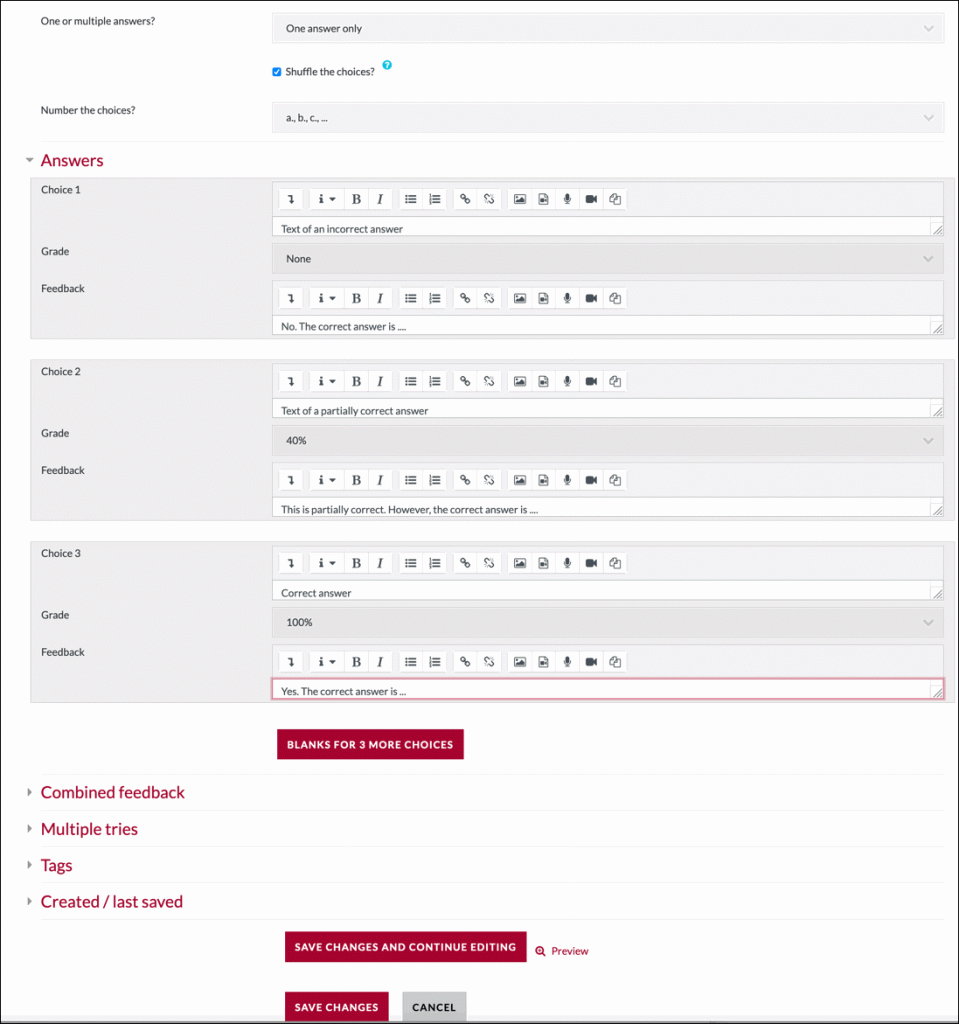
Add multiple choice questions
If you give multiple choice tests, there are two great advantage for using Moodle over paper exams. 1) Answers are graded automatically. 2) The system can give automatic feedback in response to the student’s selected answer.
When you create a multiple choice quiz question, you need to give Moodle the following information:
- One or multiple answers: How many answers should the student select?
- Shuffle the choices: Uncheck this if you want the multiple choice options to appear in a set order, such as small to largest option.
- Number the choices: This determines if/how the options are numbered for the students.
- Choice (1 2, 3, etc.): Enter the responses that students can select for the answer.
- Grade (for 1, 2, 3, etc.): Select whether a given response is worth full credit, partial credit, no credit, or even negative credit.
- Feedback (1, 2, 3, etc.): You can use the feedback to correct incorrect ideas and reinforce the correct information.
Other question types
There are many other question types, each with its own options.
Reorder questions
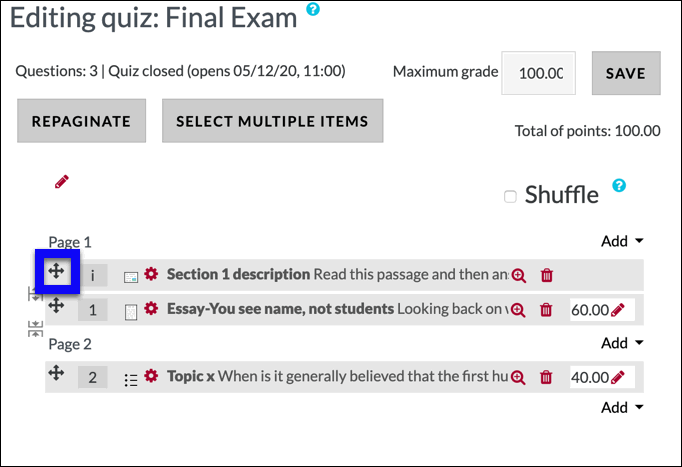
After you add your questions, you can change the order in the edit quiz mode by clicking and dragging the arrows before each question.
Page breaks
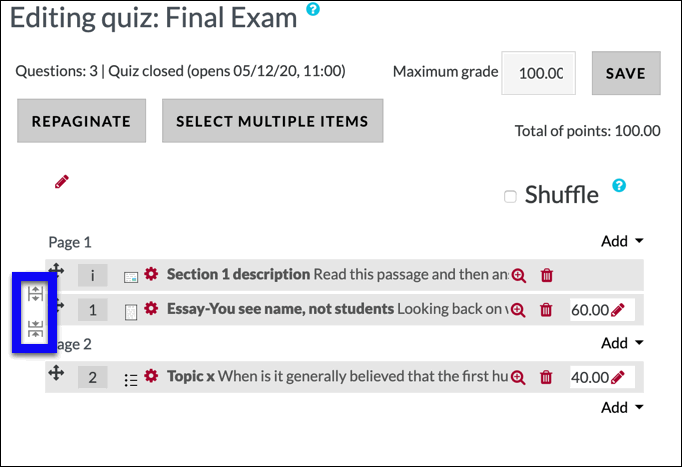
You can add or remove page breaks between questions, by click on the page break symbols between each question.
Step 3: Students take the exam
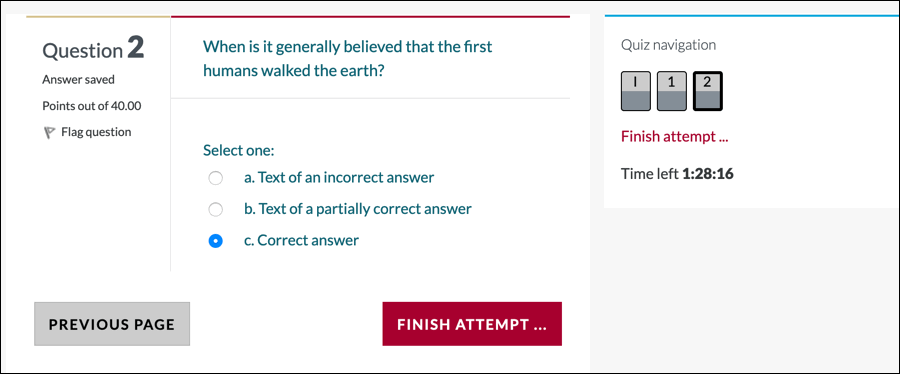
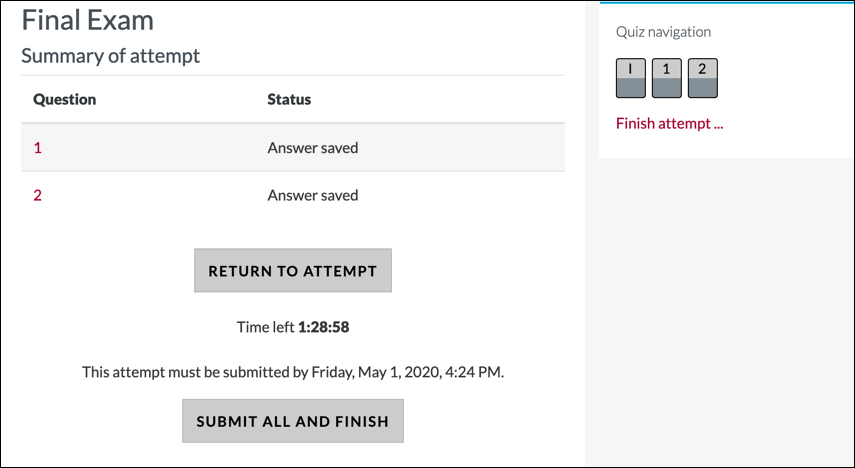
Once the quiz activity opens at the time determined by your settings, students see the exam as you set it up and will be able to answer your questions. Below are a few screenshots showing how the exam looks to a student taking it. Note that, in addition to the questions, the student has navigation options and running clock. These layout features were determined by the quiz configuration settings.
Step 4: Grade essay answers and other responses that must be graded manually
Once the tests are complete, it is time to grade. Multiple choice questions and similar question types will be graded automatically according to the scoring rules you gave when creating the questions. However, you will need to grade other questions.
There are several ways to grade responses. The easiest is to use the manual grading option in the quiz gear action menu.
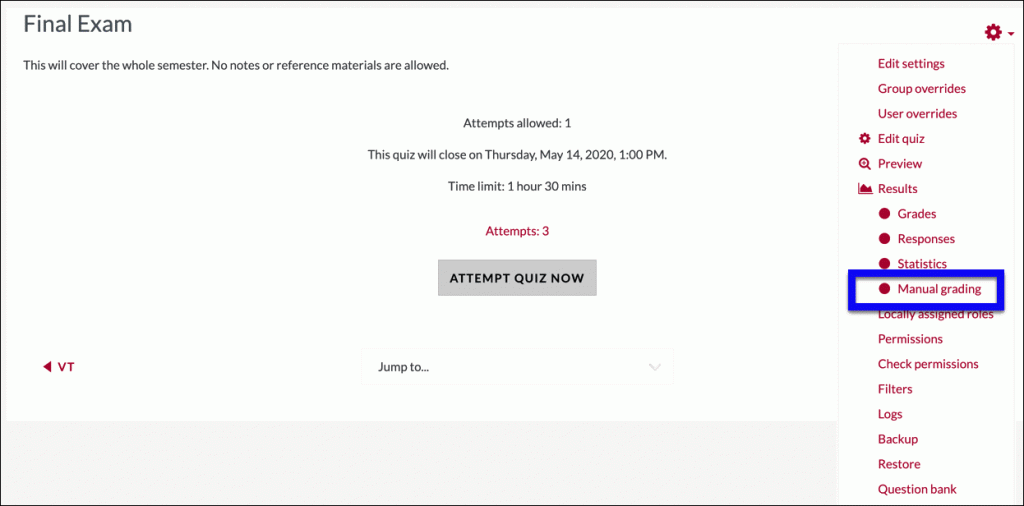
This will show you the questions that need grading, and give you a few options for how you want to display and grade the student answers.
Step 5: Get class statistics
Once you the students have taken the exam, and you have completed your grading, it is easy to see at a glance how the class did on the test.
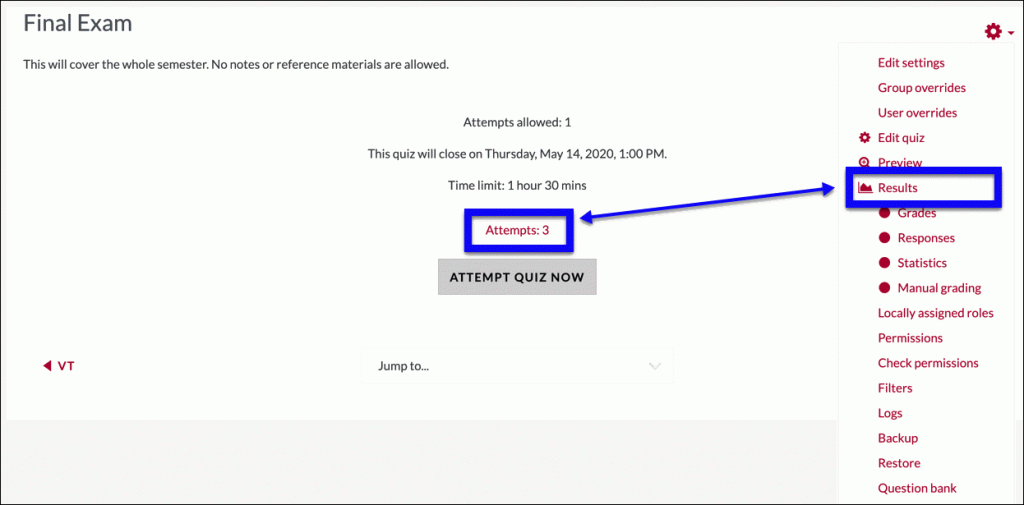
You can get quiz results, just by click on the number of attempts, or selecting the results option in the gear menu.
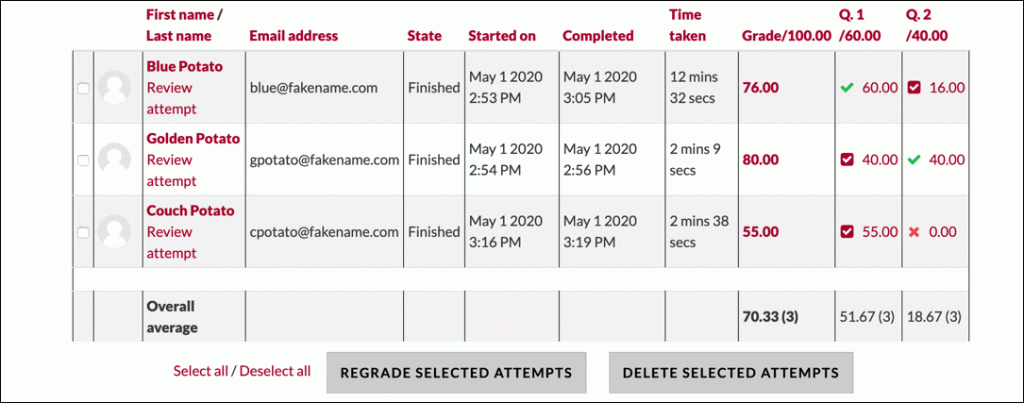
This gives an overview of results, with green checks showing perfect answers, red x marks showing mistakes, and red checked boxes showing partial credit. You can also see how long students spent on the exam and overall average scores for the exam and each question. If any responses still need grading, you can see that too.
If you want more detailed statistics, you can use the statistics option.
