The Moodle Assignment module lets you collect student assignments—including research papers, spreadsheets, presentations, photographs, and short audio or video recordings—online. The video below is a great resource for seeing how to add an assignment and to understand many of the most useful options. A text version of the information, along with some specific recommendations for Haverford faculty follows the video.
Add the assignment
- Turn Editing on from the course settings on the upper right corner of your course window.

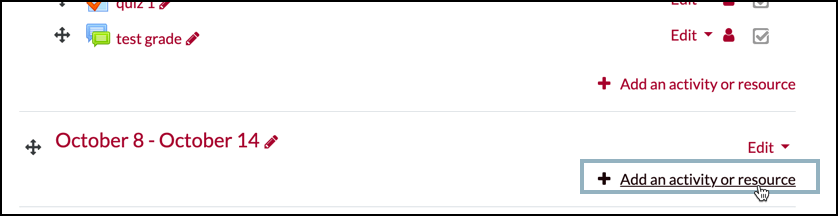
- In the appropriate week/topic, click on the “+ Add an activity or resource” link.
- Select the assignment activity and click the save button.


Configure the assignment
Now you need to configure assignment settings. By selecting the correct options, you will be able to grade student and give feedback the way you want. You can generally accept the defaults, but we recommend changing a few of the options to make submission easy for students and grading easy for you.
General settings
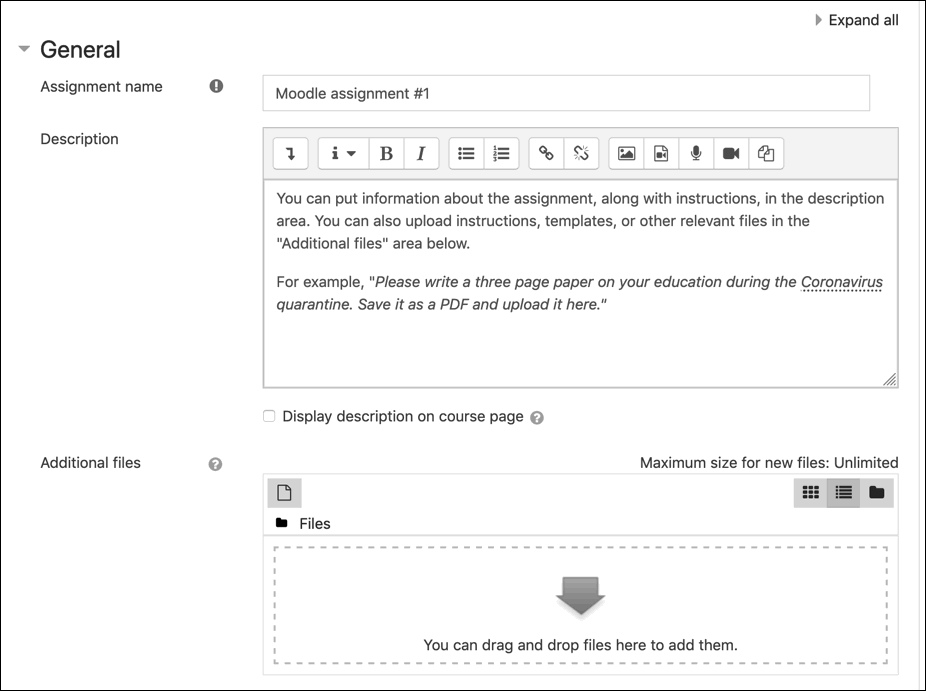
You must fill in the general setting to give your assignment a name.
You need to enter an Assignment name–the name that students see on the main course page.
You can also give an assignment Description to explain the assignment to your student. What are your expectations for the assignment? What file format, if any, should they use? If you are allowing drafts, what do you expect in the drafts and what do you expect in the final project?
You can also upload instructions, templates, or other relevant files in the Additional files area.
Availability
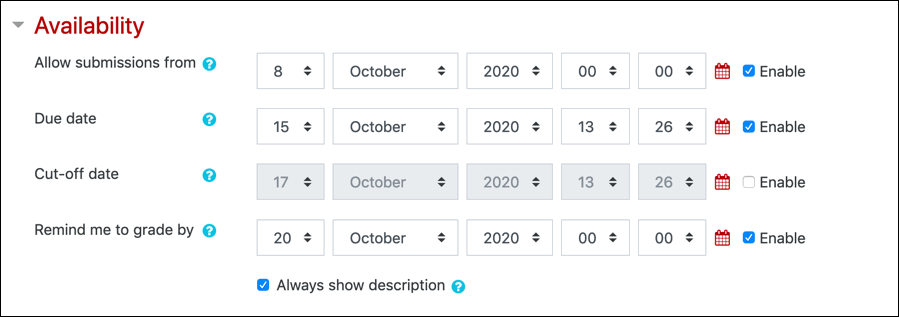
OPTIONAL: Next, you will see an Availability section. Use this to give your students due dates. Date information from your assignments will flow to the Moodle calendar. Students can see upcoming assignments on their Moodle dashboard.
You can also set a “remind me to grade by” date; this will appear on your dashboard.
Submission types
OPTIONAL: In the Submission types area, determine what your students will be submitting. If you leave the defaults, students will submit one file, up to 5 MB in size. This works for many types of assignments. However, if you have any of the scenarios below, you will want to change the defaults.
Do you want students to submit a short reading response, or other short entry, directly into the assignment text area?
Check the “online text” box.
Do you want to set a word limit for online submissions?
In addition to checking the “online text” box, enable and set a “Word limit.”
Do you want student to submit draft copies of their submission?
Increase the “maximum number of uploaded files.”
Will students submit documents over 20MB in size? 20MB is a pretty large file. Hopefully, students will be uploading files much smaller, to avoid taxing our system resources. If 20MB is not large enough, contact hc-techlearn@haverford.edu and see if there is a better tool for your needs.
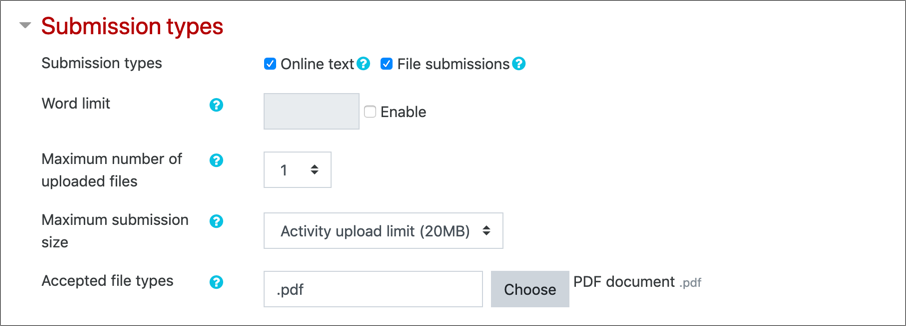
Do you want students to submit assignments in a particular format, such as a PDF, Microsoft Word format, Microsoft Excel, MP3 audio file, etc.?
Click the “Choose” button and select your desired file type for student submissions or type the file extension name into the box. Require PDFs (“.pdf”) if you want to mark up assignments directly in the Moodle gradebook.
Feedback types
OPTIONAL: In the Feedback types area, state what type of feedback you will give students–and how you will give that feedback. All options should be checked by default. However, if any options are unchecked that may prevent you from delivering feedback in your preferred way.
Check the “Feedback comments” box to give comments on each submission.
Check the “Offline grading worksheet” box, if you want to enter grades in Excel and upload them to Moodle.
Check the “Feedback files” box, if you want to return student submissions with your markups, or submit other types of feedback files such as voice comments.
Set “Comment inline” to yes, for an easy way to comment on text students submit directly into the assignment tool. This is only useful if you enable the “Online Text” submission type.

More options
In addition to the settings above, many other options are available. A few options:
- group assignments
- rubrics
- blind marking, to hide student identities when you grade
- activity completion tracking, so you can make other activities in your course dependent upon this assignment, or just help students see where they are in the course
Once you have the desired settings, click the button to save and return to course.

Grade submissions and provide feedback
Once you have created your assignment activity and students have submitted work, you will want to collect and grade student submissions. You can either download all the assignments, grade them offline, and then upload feedback files with comments or mark papers directly in Moodle.
Download all submissions and mark papers outside of Moodle
The Moodle Assignment module lets you bulk downloaded student submissions for organization and offline grading. This can be helpful in a number of situations:
- Organize and locally store submitted assignments
- Provide assignments feedback using by marking-up student submissions using tools available in desktop or tablet apps such MS Word, Adobe Acrobat Pro, Explain Everything, etc.
- Efficiently enter grades and general feedback comments using Excel, which can be faster the Moodle online grading interface
- Grade assignments anywhere; internet access is not needed
It’s not hard to use the offline grading option, but it has a number of steps both within Moodle and your local computer operating system. Watch this video on off-line marking for more information.
Mark directly within Moodle
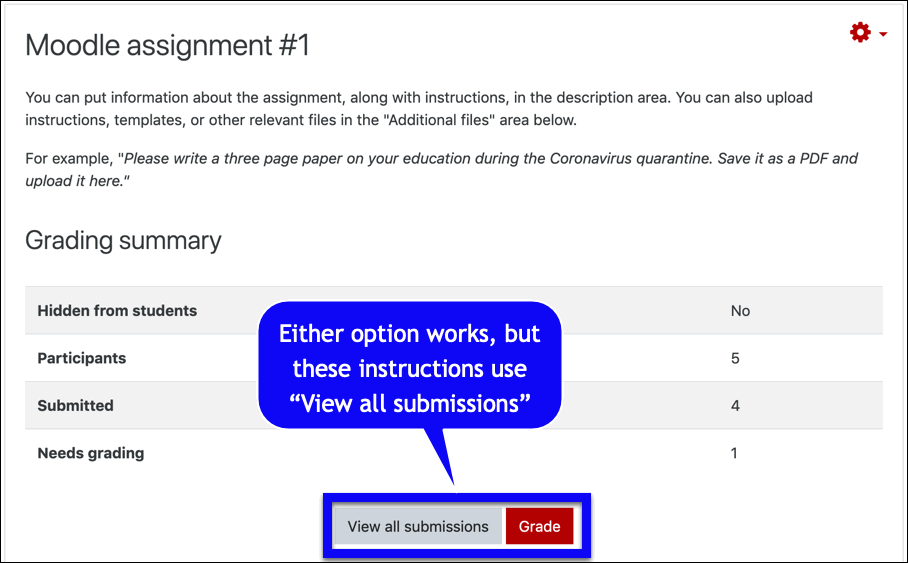
- Open the assignment activity and follow the link to either “View all submissions” or “Grade“. Both links let you grade and ultimately get to the same place. We’ll select “View all submissions” for these instructions.
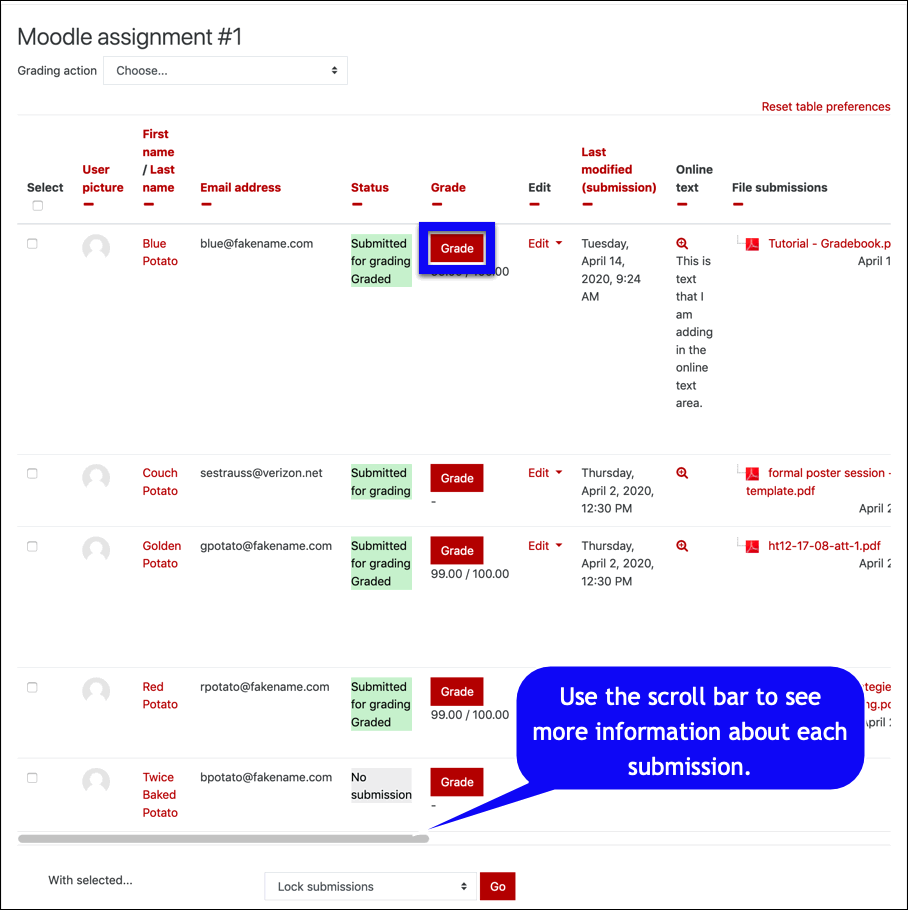
- You will now see a list of your students, along with any submissions they have done. Note that the individual view has a number of fields; use the the scroll bar to see all the information for each submission. Click on “grade” button for any student to grade the assignment and/or give feedback.
- You now see a grading window with many options. These are illustrated below.
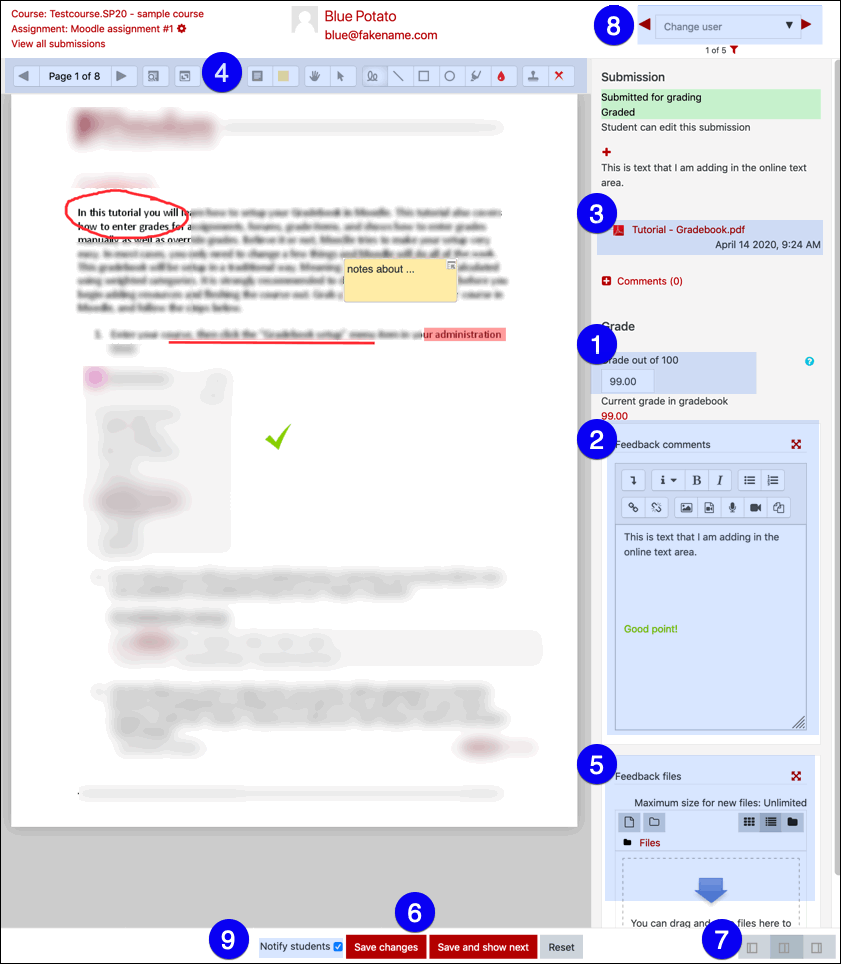
- Enter the student’s grade.
- Type or record feedback comments.
- Download the submission to look at it or annotate it outside of Moodle.
- Mark up a PDF submission.
- Return a file with your annotations or comments.
- Save the grade and continue to the next student.
- Depending upon what the student submitted, you may want to change the layout of your marking window.
- You can also select a different student from the upper right drop-down menu.
- By default, students are notified when you grade, but you can uncheck that option before saving.